https://www.youtube.com/watch?v=ntrp7i5CrfA
https://www.youtube.com/watch?v=eicQrS8pdLI
https://www.youtube.com/watch?v=P2eM9mObCHs
https://www.youtube.com/watch?v=Qt9pTU-_Zh4
https://www.youtube.com/watch?v=7Uve3bPI_tA
https://www.youtube.com/watch?v=5foLju_YK_M baguette at 14:45 full of holes
https://www.youtube.com/watch?v=YA3-xFLfZ-k baguette at :17 and 11:30 not so full of holes
https://www.youtube.com/watch?v=O2k7bbz7imQ baguette at 31:45 is moderately with holes
(the above french baguette recipe contains great technique to use!)
https://www.youtube.com/watch?v=DkHsbchF2-g baguette at 7:55
https://www.youtube.com/watch?v=8tXaZok2OsY baguette at 17:45
https://www.youtube.com/watch?v=eicQrS8pdLI&t=5s baguette at :35
https://www.youtube.com/watch?v=P2eM9mObCHs baguette at 3:35
Copied from http://www.thefreshloaf.com/node/19301/banh-mi The following words are HERS not this blogger's... I am copy them here for convenience to the reader.
..... the starting point was Andrea Nguyen's recipe at
http://www.vietworldkitchen.com/blog/2007/05/vietnamese_bagu.html. (
Andrea Nguyen's recipe is in orange on this page.)
The writer continues... I want to thank Andrea for her recipe. It got me off to a good start,
but I did end up doing it my way. which is somewhat different.
My first pass gave good results but seemed a little overproofed and a
bit tough compared to the bread at Lily. So I modified the recipe to
use both Gold Medal and KA pastry flour and the results came out very
close to what I had in Austin. I used marked proofing containers for the
second batch and found the yeast specified in Nguyen's recipe way high
for my needs. Here are the results...
The photos were inserted but unable to be viewed... perhaps she didn't compress the files?
Here is the basic recipe...
250 grams of lower protein unbleached AP flour (such as Gold Medal or Pillsbury's)
250 grams of pastry flour (such as King Arthur)
9 grams of salt
12.5 grams of sugar
4 grams of instant yeast
320 grams of water at 105 degrees F
I blended the flours, salt, sugar and yeast in a large stainless bowl
with a spoon. Added the water and mixed to a ragged dough by hand, then
switched to a plastic scraper and gave the dough about 100 "turns"
simply using the scraper to catch the ball of dough at the bowl and pull
it up and over the top, turn the bowl a bit to reposition the ball, and
repeat about 100 times. Then I put the dough in the proofing container.
The first doubling took about an hour. I then pulled the dough which was
somewhat sticky onto a granite counter and gave it one complete stretch
and fold (stretch to the top and fold, stretch down and fold, stretch to
the right and fold and finally to the left and fold, effectively
reforming a ball. Then back into the proofing container. The second
doubling took about 50 minutes. Repeat the stretch and fold process. The
next doubling took about 35 minutes. Then I formed three loaves and let
the loaves proof 30 minutes. Moved them from a linen couch to
parchment, spritzed, slashed, and loaded into a preheated 440 degree
oven on a baking stone. I used a cast iron skillet with lava rocks for
steam and added one cup of boiling water. I removed the parchment at 15
minutes and rotated the loaves. Total baking time was about 23 minutes.
While the dough was fairly sticky I found that it could be easily
handled with minimal flour during the forming process. This makes a very
nice, very light, tender baguette. Andrea and I wound up using somewhat
different processes and baking approaches so I suspect one should be
careful about baking temperature and time. Your times and temperatures
may be different - yeast needs also!
Good Luck!
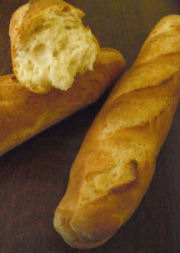
How to Make Vietnamese Baguette
This recipe yield nice, tasty baguettes that you'll be proud of. The
crumb is soft and chewy but not light and airy like the super cheap ones
that quickly go stale. The top crust is light and crisp, while the
bottom and sides are just a tad soft. Perfect for making banh mi sandwiches or dipping in bo kho beef stew or a chicken curry. Yes, it takes a good 4 hours but consider it a time and culinary splurge.
Makes two 15-inch loaves, each about 14 ounces
1 (1/4 ounce) package active dry yeast, Fleishman brand preferred, or fast-rise yeast, SAF brand preferred
1/2 plus 1 cup warm water (105-115°F)
3 1/2 cups low-protein, unbleached all-purpose flour, Gold Medal or Pillsbury brand preferred, plus extra for shaping the loaves
1 1/2 teaspoons salt
1 tablespoon sugar
 Special equipment: Large capacity food processor; a
double (15-inch long) dark, nonstick French bread pan; a razor blade or
very sharp knife; plastic dough scraper; plastic spray bottle.
1. Put the yeast in a small bowl and add the 1/2 cup water. Set aside
for 2 to 3 minutes to soften the yeast. (It will look kind of blotchy
as the granules break down. It may also get a bit foamy too.)
2. Meanwhile, outfit the food processor with the regular chopping
blade to make the dough. Put the flour, salt and sugar into the food
processor.
3. Return your attention to the yeast. Use a whisk or spoon to gently
combine the yeast and water well. Pour in the 1 cup of water and gently
whisk or stir again to combine. With the feed tube removed, start the
food processor. Slowly pour the yeast mixture into the flour mixture in
processor, blending just until the dough forms a ball and pulls away
from side of processor bowl, about 1 minute.
4. Replace the feed tube and let the dough rise until it nearly fills
the bowl, about 1 hour. Pulse 1 or 2 times to slightly deflate the
dough. Let the dough rise again and deflate. Let the dough rise one more
time. You're shooting for 3 risings. As you progress, each one will
take less time.
5. Flour your work surface and hands with about 1 tablespoon of
flour. Detach the processor bowl from the machine. Holding the bowl
upside down above your work surface, turn the very soft and sticky dough
out onto your work surface, taking care to notice where the blade is in
the blob of dough. (The dough scraper is handy for removing the dough
from the walls of the processor bowl.) Remove the blade from the dough.
Gently rotate the dough on your work surface so it is lightly covered by
flour and does not stick. Use the dough scraper to divide the dough in
half, setting one half off to the side. (If it's unwieldy, use the
scraper to move it around the work surface, lest the dough stick to your
fingers!)
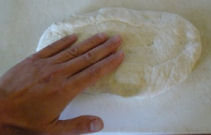 6. To shape each baguette, use lightly floured hands to gently press
one half of dough into an 8- by 5-inch rectangle or football shape. It
should feel lofty and soft. The dough should naturally stretch
lengthwise in one particular direction. Think of that as the grain of
the dough. You want to shape the loaf along the grain of the dough to
promote a big rise.
Fold the top third down and the bottom third up as if you were
folding a very wide and narrow business letter. Gently seal the edges by
pressing with your fingers or the palm of your hand. The result should
look like a fat log. (If you have a rectangle of sorts, you can repeat
the folding and pinch the edges to seal to create a log.) Your aim is to
coil the dough so that when it's baking, it will spring and burst open
beautifully. Try to keep as much of the air in the dough as possible
without breaking the skin.
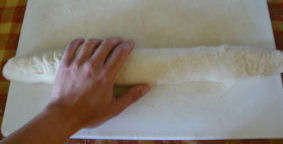 Turn the log over (seam side down) and start rolling the log back and
forth (have your hands flat facing downward) to elongate and stretch it
into a 15-inch-long thick rope that's 2 to 2 1/2 inches wide. Try not to
stop for long lest the dough sticks to your work surface. The dough
should be very soft and easily yield to your motions. Pick up the dough
with both hands and place seam side down in the cradle of one of the
bread pans. Repeat with the remaining half of dough.
7. Loosely cover the loaves with a dish towel to prevent the dough
from drying and inhibiting rising in the oven. Set aside in a warm
draft-free place for 30 minutes, or until just shy of double the
original size.
8. Meanwhile, put a large roasting pan with 1 inch of hot water in it
on bottom of gas oven or on lowest rack of electric oven. Position the
oven rack in upper third of oven. Preheat the oven to 450°F.
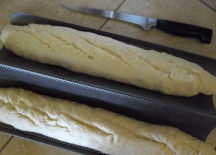 9. When the loaves have risen enough, they're ready for baking. Fill
the spray bottle part way with water. Use a razor or sharp knife to make
4 or 5 shallow diagonal slashes down length of each log. The cuts
should run the length of the log, be about 4 inches long each, and ¼ to
1/2 inch deep. Angle the razor or knife at about 30 degrees. Mist the
loaves with 4 to 6 sprays of water.
10. Slide the pan into the oven onto the upper 3rd rack and bake for
20 minutes. After baking for 3 minutes, mist the loaves. Repeat the
misting after baking for another 3 minutes. Then, let the loaves bake.
At the 15-minute mark, you may rotate the pan for even browning. At the
20-minute mark, gently turn (you may have to pry it free just a tad) the
loaves bottom side up in the pan to promote even crisping and browning.
Bake for about 5 minutes, during which you can even rotate the loaves
so that the sides brown and crisp too, or until the loaves are crisp all
over. The browning happens quickly at this stage so carefully monitor
the loaves to prevent burning.
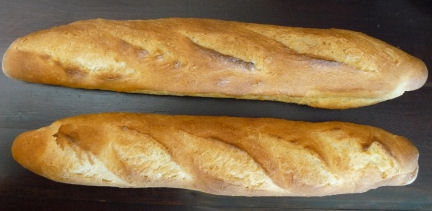 Transfer each loaf to a rack to cool. The bread is wonderful warm after
having cooled for about 30 minutes. They'll remain at their best for
about 6 hours after baking and can be reheated in the oven. Store
overnight in a thick paper bag. To freeze for up to 2 months, wrap in a
double layer of plastic wrap; defrost at room temperature and reheat in a
350F oven for about 10 minutes to refresh and crisp.
Also watched this video...
which I had as much confidence as the tall one with the cigarette...
https://www.youtube.com/watch?v=4bJMquOt1qM
Poolish
https://www.youtube.com/watch?v=KspoWmDNt08
125 grams lukewarm water
125 grams all-purpose flour
1/8 teaspoon active dry yeast
INSTRUCTIONS
Mix all and seal in a container in room temperature. It will be ready to
use after 3 hours and should be okay to use for up to 3 days. The
longer it sits, the more flavorful it will be.
https://www.youtube.com/watch?v=grlol9luJjA
5 oz water 10tsps
5 oz of flour 10tsps
.5 oz of yeast 03tsps
https://www.youtube.com/watch?v=ZRK8iLvzubY
65g water
80g flour
1/4 teaspoon dry yeast
Mix loosely

 6. To shape each baguette, use lightly floured hands to gently press
one half of dough into an 8- by 5-inch rectangle or football shape. It
should feel lofty and soft. The dough should naturally stretch
lengthwise in one particular direction. Think of that as the grain of
the dough. You want to shape the loaf along the grain of the dough to
promote a big rise.
 Turn the log over (seam side down) and start rolling the log back and
forth (have your hands flat facing downward) to elongate and stretch it
into a 15-inch-long thick rope that's 2 to 2 1/2 inches wide. Try not to
stop for long lest the dough sticks to your work surface. The dough
should be very soft and easily yield to your motions. Pick up the dough
with both hands and place seam side down in the cradle of one of the
bread pans. Repeat with the remaining half of dough.
 9. When the loaves have risen enough, they're ready for baking. Fill
the spray bottle part way with water. Use a razor or sharp knife to make
4 or 5 shallow diagonal slashes down length of each log. The cuts
should run the length of the log, be about 4 inches long each, and ¼ to
1/2 inch deep. Angle the razor or knife at about 30 degrees. Mist the
loaves with 4 to 6 sprays of water.
 Transfer each loaf to a rack to cool. The bread is wonderful warm after
having cooled for about 30 minutes. They'll remain at their best for
about 6 hours after baking and can be reheated in the oven. Store
overnight in a thick paper bag. To freeze for up to 2 months, wrap in a
double layer of plastic wrap; defrost at room temperature and reheat in a
350F oven for about 10 minutes to refresh and crisp.